Dreamweaver MX
Week 9 - November 14th 2006
Built-In Javascript
Dreamweaver has the ability to write basic javascript coding to perform certain common functions. What we're going to work with today is Rollovers and Navigation Bars.
Image for Today's Lesson


Rollovers - From Scratch
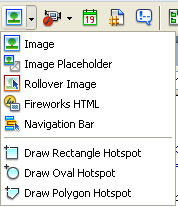
We're going to start by looking at making a rollover from scratch. From the Common Menu (Images pull down) select "Rollover Image".
Once you've selected Rollover Image, a dialogue box with appear:
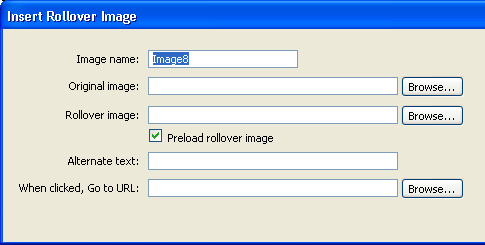
First off, give your image a name; if you plan on having a lot of images on your page, you should try to make it descriptive so that it's easier to work with if you decide to change the page later. Now use the browse button to select the default state of the image, and the rollover state of the image.
You'll see a checkbox, it will likely be pre-checked, for Preload Rollover Image. This checkbox will tell Dreamweaver that you want to get the image into the user's cache, so that when they rollover the image they don't have to wait for it to load. If you don't do this, it often looks bad for large images or on slow computers, because the original image disappears and the rollover image hasn't been loaded yet... leaving your user with a big empty space.
You can also enter Alternate Text for your image, which you should always do, and if you want your image to be a link to another page, you can can also enter a URL, or browse for a page within your site.
Rollovers - From a Pre-existing Image
Let's say that you already have an HTML page written with an image already in the correct location, but you've decided to make it into a rollover image. Rather than deleting it, and then putting it back in with the above method, you can use the behaviours panel in Dreamweaver to add a rollover state to the image.
Your behaviours panel should be among the panels that sit on the right side of the work area,but if it's not there go to Window > Behaviours to open it. The first step is to select the image you want to modify. Now look at your Behaviours Panel and press the + button at the top.

Select Swap Image from the list. A dialogue box will appear, similar to the one above, but since Dreamweaver already knows the original image it has taken that part of the dialogue box out.
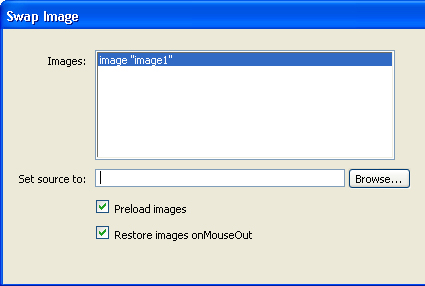
Select the file you want to appear on rollover. You are given the option to once again Preload the Images, but also there is a checkbox for Restore Images onMouseOut. This checkbox is asking you if you want to normal image to return once the mouse has been taken off of the image.
This dialogue box will also allow you to do fancy rollovers, where you move the mouse overtop of an image, but another image is changed. That's what the big box labeled Images is on the Swap Dialogue box. You can select another image on the page, by the image name (i.e. <img src="image.jpg" name="image1"....>).
You select the image that will trigger the action, add the new behaviour to it through the panel, then select the other image to change and the source for that file. When you rollover the first image, the second image will change. You can also change the first images at the same time.
Navigation Bar
The Navigation Bar is very similar to the single image rollover, except that it adds a few more states to each images, and also indicates what the last image selected was. Just like starting an image rollover from scratch, select Navigation Bar from the common menu. This will bring up a new dialogue box.

Give your Element a name, then choose the different images for each state. Up and Over you've seen above. Down is the state that indicates what button has been pressed, and Over while Down, is what the pressed button will look like when rolled over, if you want different look. These images are optional. Once again, you can specify the Alternate Text and URL for the element, and whether you want to preload the images. Show down initially will allow you to set the down state onto the Navigation Bar to indicate that you're already on that page. The pull down that is defaulted to Main Window, is the only option available at the moment, I assume this will change to include frame names in the event that you create this on a frame site.
You can also choose whether you want your navigation bar to appear horizontally or vertically. This will depend on how you want your page to look. It will also give you the option to build the Navigation Bar in a table. Please note, that if you don't put it in a table, Dreamweaver does not create a list item to keep the links separated; as I taught earlier in the course with our text menus.
Press the + button to add more elements to your Navigation Bar. As obviously if you're creating navigation, you'll want more than one link. You can also delete links from the Navigation Bar, and change the order they appear in by pressing the up and down arrow buttons.
Also, when working with the Navigation Bar in Dreamweaver, it will only allow you to have one per page. If you try to create another one, it'll tell you that you already have a Navigation Bar built, and will ask if you want to modify it.
Other Built-In Javascript
Dreamweaver also has pieces of pre-written javascript code that you can incorporate into your page. They can be found in your snippets panel. They contain basic coding like area calculations, mathematical conversions (i.e. decimal to hexadecimal, Celsius to Fahrenheit, etc), write cookies, put the current date on the page, etc. Some pieces of code will require other snippets to be included in the page in order for the code to function properly, but this will be included in a javascript comment in the snippet itself. One this to be aware of, the individual snippets don't have the javascript tags included, you have too use the Starter Script snippet to make the tags, or do it manually.
We won't go into too much detail on this part of Dreamweaver because you should probably understand at least basic javascript/programming concepts before attempting to use these snippets to create dynamic functions on your webpage.