Dreamweaver MX
Week 1 - September 19th 2006
The first class of the course familiarized the students with the Dreamweaver MX 2004 interface. An overview of the different panels in Dreamweaver were explored, more depth will follow in the coming weeks. While the most prominent features of the software were covered, the following screen shots point out the most important features relating to this course.
Preferences
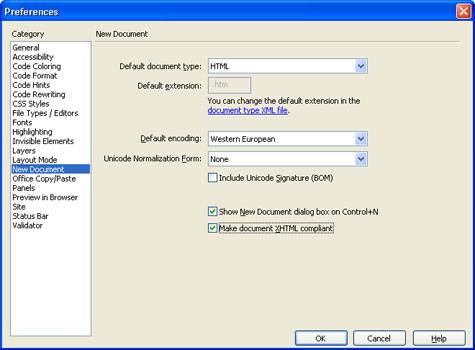
Be sure to check the "Make document XHTML compliant" checkbox under the "New Document" category in the Preferences Dialog Box.

Internet Explorer is generally the default browser listed in Dreamweaver's Preview in Browser Preference. Be sure to add other browsers to test your pages in. I recommend Mozilla Firefox as that browser is gaining popularity. Feel free to add as many browsers as you like, Netscape works off the same system os Firefox as they are both Mozilla based browsers, Opera is another browser to consider. Be aware that you can only set up two hot keys for your browsers, your primary and secondary; so choose the two most common browsers. All other browsers in this list will have to be chosen from a pull-down list when you want to preview them.
Insert Panel

The Insert Panel is a quick way to add elements to your HTML pages. This menu is categorized to help facilitate the usability of the panel.
Document Window
![]()
This menu allows you to change from Code, Design, or Split View instantly. It also provides a textbox for quick changes to the document title. The globe icon provides a pull-down listing all the browsers set up in your preferences.
Properties Panel

The Properties panel provides a quick and easy way to adjust the styles applied to sections of your text. Make sure you're aware of the code that Dreamweaver writes.
Site and Design Panels
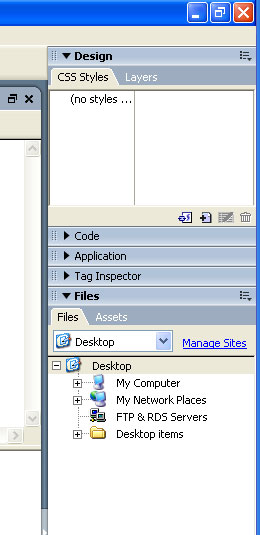
The Design Panel provides information about the CSS styles applied to the page. This panel will show the tags, classes, and ids that have styles applied to them. This panel will also allow you to open the CSS dialog box top adjust styles in your page.
The Site Panel shows you the current site chosen selected while working in Dreamweaver. The pull-down list will allow you to easily switch between sites, or create a new site. If no sites have been created on the particular machine, the site panel will display your computer desktop.
Setting Up a Site In Dreamweaver
To use Dreamweaver efficiently for making and updating pages, version MX was the first version to include Site setup with a built in FTP client. FTP stands for File Transfer Protocol and is one of the most common methods of getting files from your local machine to your hosting service. At Fleming, this technically isn't necessary since your H: drive is also a network drive linked to the Fleming web server. The thing you must keep in mind though, is that all the files you want to be on the internet (ie. your HTML page, all your images, flash files, word documents, etc) must be in your folder called htdocs. This will vary from server to server depending on who you host with, but that information will be provided by the hosting company. Of course, this doesn't help those of us working from home since we don't have the fleming H: drive on our home computers. So this tutorial will show you how to set up your dreamweaver site from home so you can upload your files to the internet.
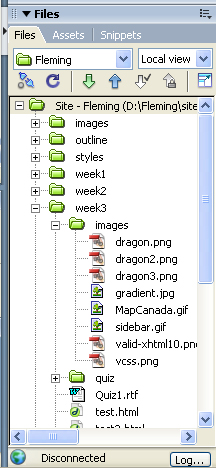
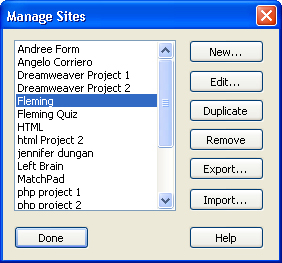
The Files panel, shown in the panel above is where you go to set up your site. You'll see in this particular image that no site has been made, and you'll see a link for "Manage Sites", if you already have a site setup your files panel will look like this:
You can access the Manage sites from the pull down menu:
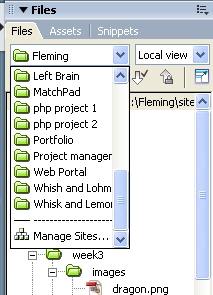
As you can see in my case, I have many different sites setup on my computer, I make a new site for every different website I work on. The Site currently selected is "Fleming" which is the site I set up to do the very pages you're reading. Now we'll go step by step of setting up your site for Fleming.
- Go to Manage Sites (see above)
- You'll see a Dialogue Box appear with a list of existing sites
- If you're making a new site select "New...", if you'd editing an existing site select the site and choose "Edit..."
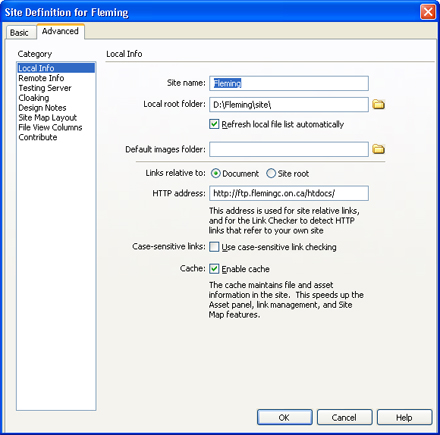
- The first section that is of interest to you is local
-
Use the following settings:
- Site Name: Fleming
(this can be anything you want, it makes no difference... this is the name that shows up in your list of sites so that you can tell them apart) - Local Root Folder: Set this up to the folder on your hard drive where you are saving your files
- Default Images Folder: This is optional, I usually don't bother filling this in, but you can specify the folder for images (remember this MUST be inside your site directory)
- HTTP Address: Don't worry about this, Dreamweaver will fill it in for you
- Site Name: Fleming
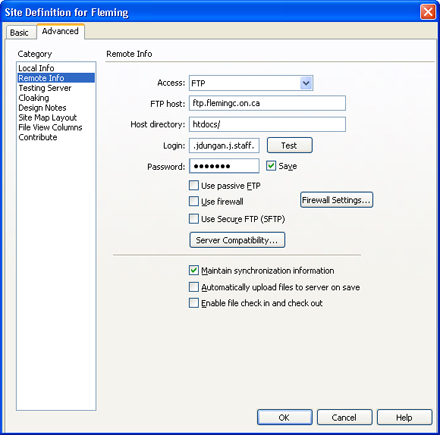
- The next section we're going to look at is the remote info
- Use the following settings:
- Access: FTP
- FTP Host: ftp.flemingc.on.ca
- Host Directory: htdocs/
- Login: This is where you put in your full login - .username.firstletteroffirstname.students.brealey.fleming
- Password: your password
- Make sure you click the "Test" Button to be sure you are connecting to the server properly
- These are the most important sections of setting up a site, you really don't need to worry about the other sections until you start getting into more complex programming for the web
Uploading Files
In order to upload files and folders to your Dreamweaver site, select the file you want to upload (in this case week1.html, you can select entire folders or multiple files as well):

Now press the blue arrow button (this is the "Put Files" button). This will connect to the server and upload the file in the same folder structure you have set up locally. It will ask if you want to include dependent files. This means it'll upload all the images and other files that you have linked to the page you're uploading. In my case it'll upload all my image files on this page. So my images are in subfolders week1 > images, Dreamweaver will automatically make a folder called week1 on my server, a folder inside of week1 called images, and upload copies of all my image files to that folder so that my page loads properly when loaded from the internet.
The same is done for getting files from the server onto your harddrive. If you have an older version of the file already on your hard drive, you can select it and press the green arrow button (the "Get Files" Button) and it will download a copy of the file from the server and overwrite the old file on your hard drive. This will only work if the folder structure is the same. Dreamweaver will look for the file in the same folders on the server, if that file isn't in the correct spot the Dreamweaver will not be able to download the file. If you don't have the files select your "remote view" from the pull-down menu to the right of the sites pull-down menu. Dreamweaver will connect to the server and show you the files that are on the Fleming server. Then select the file you want to download and click the green arrow button again, this will download the file in the same structure, so if the file you are downloading is within a folder structure, it will download the file into the same structure on your hard drive.