Dreamweaver MX
Week 6 - October 24th 2006
Dreamweaver Templates
This week we're going to work with a pre-made HTML page and make it a template for an entire site.
- Pre-made Page
- Image used in the page:

Detailed article coming soon
Media Embedding
Example files for today's class
Making Pages with Templates in Dreamweaver
The first and most important thing about making sites with Dreamweaver is that you MUST have a site defined in Dreamweaver so that the program knows the structure of your entire site and can make the appropriate relative links when making new pages, and updating old ones. Without a defined site, Dreamweaver cannot understand your file structure and therefore won't be able to make the appropriate changes to your pages when you update the template.
The second most important thing is that you must have your pages on your local hard drive to update them. Technically you could have it update your live files, but you'd have to change your preferences to make all changes automatically saved to your remote folder, which isn't really a good idea because if you mess something up you can't go back to what you did before, it also means any mistakes you have are now live to the web and people can view those pages. So it's just safer for you to make sure all your files are local and in a proper site setup.
One thing you need to be aware of, is if you change your template inside of an editable region, the pages you've made will not update. This is because Dreamweaver makes the assumption that all the information inside of an editable region is completely unique form all the other pages. So if you have made your menu system an editable region because you don't want a the page your on to have a link to itself, I'm afraid you'll have to do it the long way and edit all your pages. Of course, any new pages that you make will have the updated information from the template.
Once you've set up a site definition in Dreamweaver, it's time to begin making your template. Start this as you would any other page. Make a new HTML document and create your layout, apply styling, add images, add lorem ipsum for dummy content, etc. In other words, have the proper pathing and folder structure that you want in the final website. I recommend saving this file as a normal HTML page in another folder, just so you have another copy if something happens to your template. Then go to File > Save As Template. You should see the following dialogue box:
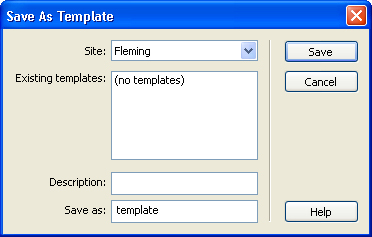
This dialogue box has a pull-down listing of all the sites you have defined in your Dreamweaver, and all the templates that those sites have associated with them. You can have as many templates in a site as you want/need. Give your template a name in the Save As input, you can also add a description if you like. If you're working with a multi-template site, you may want to make your template names a little more descriptive than "template", but you can call it what ever you like.
Once you've named your template, save it. A new folder should appear in your site called "templates", and inside you should see a file with a dwt file extension. Dreamweaver should ask if you want to update links, say yes, this will update the links in the template because it is now in a sub-folder. This is why having a site defined is necessary. Dreamweaver keeps track of the folders and subfolders, so all your links in the template file should have "../". When you create a new file, Dreamweaver will save it in the main folder, or a subfolder of your choosing, and Dreamweaver will adjust the relative link to work for the page's unique position within your site.
You'll notice Dreamweaver complains about missing editable regions. You can add them before, Dreamweaver will prompt you to save as a template if you do this, but I like to add my editable regions after I've saved the initial file. Either way is more than acceptable. Now you have to add editable regions to your page. You'll notice that Dreamweaver has already made a few automatically. These sections consist of a section entitled "doctitle" and a section called "head". These describe exactly what they are; the doctitle surrounds the <title> tag (so that you can give each page a unique title) and a section inside the <head> tag (so you can add javascript, CSS, or other information without accidentally removing some of the necessary tags already present. If you need to add another section NOT within the body tag, you must add it manually through code, otherwise Dreamweaver will automatically add it directly into the body tag. To add one manually, you have to make a dreamweaver comment with the following syntax:
<!-- TemplateEndEditable -->
The code must be exactly as shown, the only part you can change is the part within quotation marks. Otherwise, Dreamweaver will only see it as a normal HTML comment. To add editable regions inside the body tag, you can either add them manually, or by highlighting the section you want to make editable then going to Insert > Template Object > Editable Region. Dreamweaver will then ask you to give that region a name; name it something that makes sense. You should be able to add Editable Regions by highlighting in Design Mode and in Code Mode (at least in Dreamweaver 8, I'm not sure if MX 2004 will allow it to be done from code view).
Now that you have your template made, you can start building your site from that template. The first step is to CLOSE the template file, you don't want to accidentally start putting content into the template itself. While this won't hurt the template (well depending on what you add), but the main reason is if you make your page from the open template page then save as a an HTML file, your page will not be linked to the template. That's why we close it, to avoid making that mistake.
To make a page that will be linked to your template, you must go to File > New. A dialogue box will appear, make sure you click on the Templates tab.
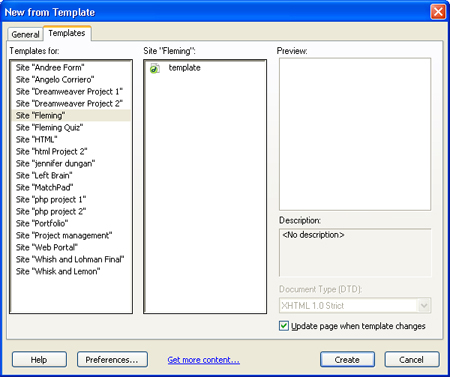
Here you'll see a list of your dreamweaver sites and the templates that go with them. Choose the template you want to use, make sure you have "Update Page When Template Changes" checked, then hit Create. Now you should have a page identical to your template opened in your Dreamweaver menu, and you can start to add content.
If, after you've started making pages, you want to make a change to your template, open it up and do so. When you save it will ask if you want to update the pages associated with it, and it will provide a list of those pages. Make sure you say yes. Also, remember that any pages that are currently open in Dreamweaver will update, but will not automatically save. This is indicated by a * following the file name on the tab for the page. You MUST save these pages to ensure that the new information from the template will be present in your pages when you preview or upload them.
You may also encounter an issue where a page has become separated from it's template. You can re-attach the page to a template by going to Modify > Templates > Apply Template to Page, then selecting the template you want to associate the page with. Dreamweaver will likely ask you to match up the editable regions for the page to work properly with the template. Personally, I find it more trouble then it's worth to try and re-attach a page to a template. Sometimes it just much easier to make the page over again, and copy and paste the content into the new page.
There may also be a time when you want to sever the page from a template because you want it to be different from the other pages, to do this go to Modify > Templates > Detach from Template. This will sever the page from the template, keeping the styling the same until you change it.
Embedded Media
To embed sound and video into an HTML page, click on the media pull-down from the common menu. The icon will vary depending on the last item imported was, but it will be located to the right of the image button. Choose Plugin, a dialogue box will appear where you can select the file you want to import. Remember this file must be in a site folder to upload to your remote server when the time comes.
An <embed> tag will automatically be written into your HTML document (make sure it's inside the <body> tag). A default height and width of 32 pixels will be included in the code, you'll want to change this in the properties panel so that a usable control will be visible to the people visiting your site. You can also add the following attributes manually to the <embed> tag to change specific details.
- Autoplay - "true" or "false"
- Hidden - "true" or "false" (hides the controls)
- Loop - "true", "false", or a number of times to loop
- Volume - number between 0 and 100 (%)
- There are a few more attributes you can add, but they're pretty obscure
In my opinion, you still might be better off to use flash to create a player for sound of video, because you can customize the look and size of the player without having to worry about whether the user's default plugin is Quicktime, Windows Media Player, Real Player, or one of other various media players, and each of these players will have a different look and size associated with them. If you have Dreamweaver 8, there is another option under the media button, and that is flash video, which will convert your video into a flv file (compatible with both Mac and PC) which has one of the better codecs for the web. It will also allow you to chose a predefined skin for the play controls (like Flash Buttons).
To import flash files, instead of using the Plugin option, instead choose Flash. Again a dialogue box will appear allowing you to choose the flash file you want in your webpage. Luckily this method will default to the flash video size, so you won't have to resize it yourself.
Flash Buttons and Flash Text are very similar. Except instead of choosing something that you make yourself, Flash Buttons have premade buttons that you can customize the text and a few other aspects, and put into your page with little effort. Flash Text, allows you to use fancy fonts that many people don't have in your HTML page. There is a few problems with this however, the first being that there's no accessibility in this method, meaning that it's invisible to speech browsers, the other problem is that if the user doesn't have the flash player installed (rare, but not unheard of) they can't see anything there either. One method some of you might be interested in is a method called sIFR (Scalable Inman Flash Replacement). You can find out more about this on the official sIFR website.
One problem you'll encounter with your embedded flash files, is that in IE, you have to click the flash file to activate the control, then click again to get the action associated with the file. This doesn't occur in Firefox, but since 90% of the world uses IE, this creates a small problem. The method I use can be found on the Deconcept website.